
Nikon Camera Remote Control Circuit Diagram


Overview

This is an IR remote control for Nikon cameras. It is compatible with the Nikon ML-L3 remote control. Supported cameras include: D40, D40X, D50, D60, D70, D70s, D80, Coolpix 8400 8800. This design is based on an idea from http://www.bigmike.it/ircontrol/.

Hardware

The circuit is extremely simple: an ATtiny13V, button, transistor, resistor, IR diode and 3V battery. You could even omit the transistor and resistor, and connect the IR diode directly to the ATtiny13V, but that will limit the LED current and therefor the range.

schematic

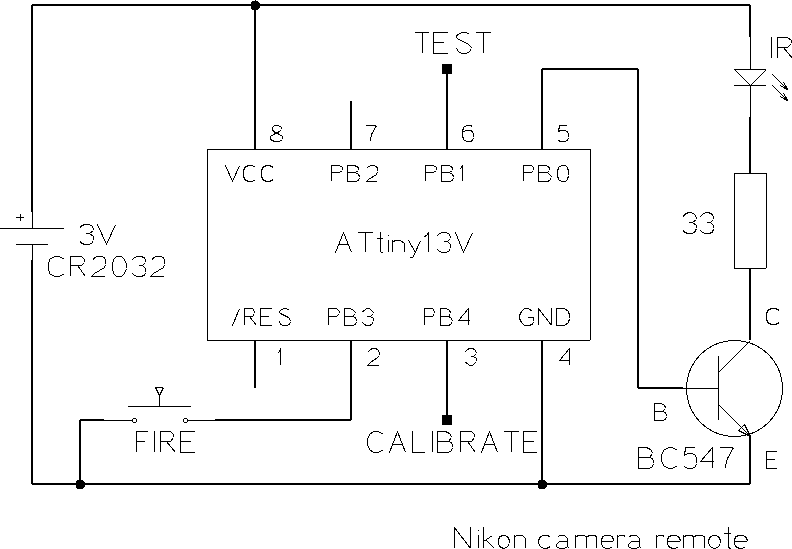
I chose to power the circuit permanently, and connect the button to an input, instead of controlling the power with the button. This ensures that the IR sequence is always completely sent, even when you release the button too early, and that contact bounce may be filtered. The standby power consumption is so low, about the same as the self-discharge rate of the lithium battery, that this does not really affect the battery life.


The internal oscillator of the ATtiny13V is used as a clock source, which seems to be sufficiently accurate. To get optimal results, you may want to calibrate the internal oscillator. See main.c for details.

Comments

Popular posts from this blog

Power Amplifier with voltage regulator 4 × 50 Watt TDA8588

Power Amplifier with voltage regulator 4 × 50 Watt TDA8588    The TDA8588 is a multiple voltage regulator combined with four independent audio power amplifiers configured in bridge tied load with diagnostic capability. The output voltages of all regulators except regulators 2 and 3 can be controlled via the I2C-bus. However, regulator 3 can be set to 0 V via the I2C-bus. The output voltage of regulator 2 (microcontroller supply) and the maximum output voltage of regulator 3 (mechanical digital and microcontroller supplies) can both be either 5 V or 3.3 V depending on the type number. The maximum output voltages of both regulators are fixed to avoid any risk of damaging the microcontroller that may occur during a disturbance of the I 2C-bus. The amplifier diagnostic functions give information about output offset, load, or short-circuit. Diagnostic functions are controlled via the I2C-bus. The TDA8588 is protected against short-circuit, over-temperature, open ground and open VP connectio

PIC16F887 877 programming in C Tutorial 5 LCD Interfacing

LCD Interfacing: In this tutorial i will show you how to interface 16x2 LCD with micro-controller. 16x2 means there are two rows and each row contain maximum 16 characters.  For more detail refer to the LCD datasheet, which you are using. Basic Connection: Applies 5v to pin 2 and gnd to pins 1 & 5. Use variable resistor at pin 3 to set contrast. Pins 7 to 14 are the data pins,, used to send/rec data. Pin 6 is of enable; every time when you write to lcd you should have to give high to low, to this pin. pin 4 is register select pin use to give commands like clear, home etc.   In this tutorial i will interface lcd in 4-bit instead of 8-bit, so we only required four data pins. Code: Lets write a code that will display the motor status and its direction; it will be fun!!!! Requirements: Design a motor controller circuit using l298 and display its status on lcd. LCD is connected to portb and motor controller circuit is at portd. Required two switches to change motor direction; if both ar

12V to 30V DC to DC Converter circuit Diagram

 12V to +/- 30V DC to DC Converter circuit Diagram This is a DC to DC converter for car power amplifier. 12V input generates +30V and -30V output for preamp or power amplifiers. Circuit uses SG3525 IC, Mosfets and switching power supply.