LCD Module in 4 bit Mode


In many projects use is made of alphanumeric LCDs that are driven internally by Hitachi’s industry-standard HD44780 controller. These displays can be driven either in 4-bit or 8-bit mode. In the first case only the high nibble (D4 to D7) of the display’s data bus is used. The four unused connections still deserve some closer attention. The data lines can be used as either inputs or outputs for the display. It is well known that an unloaded output is fine, but that a floating high-impedance input can cause problems. So what should you do with the four unused data lines when the display is used in 4-bit mode? This question arose when a circuit was submitted to us where D0-D3 where tied directly to GND (the same applies if it was to +5 V) to stop the problem of floating inputs.

The LCD module was driven directly by a microcontroller, which was on a development board for testing various programs and I/O functions. There was a switch present for turning off the enable of the display when it wasn’t being used, but this could be forgotten during some experiments. When the R/Wline of the display is permanently tied to GND (data only goes from the microcontroller to the display) then the remaining lines can safely be connected to the supply (+ve or GND). In this application however, the R/Wline was also controlled by the microcontroller. When the display is initialised correctly then nothing much should go wrong. The data sheet for the HD44780 is not very clear as to what happens with the low nibble during initialisation.
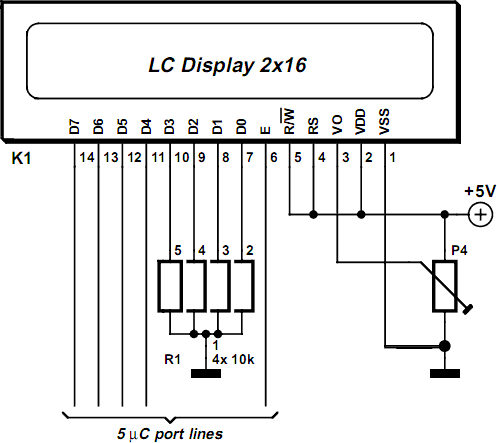


LCD Module in 4-bit Mode Circuit Diagram

After the power-on reset the display will always be in 8-bit mode. A simple experiment (see the accompanying circuit) reveals that it is safer to use pull-down resistors to GND for the four low data lines. The data lines of the display are configured as outputs in this circuit (R/Wis high) and the ‘enable’ is toggled (which can still happen, even though it is not the intention to communicate with the display). Note that in practice the RS line will also be driven by an I/O pin, and in our circuit the R/W line as well. All data lines become high and it’s not certain if (and if so, for how long) the display can survive with four shorted data lines. The moral of the story is: in 4-bit mode you should always tie D0-D3 via resistors to ground or positive.
Author: L. Lemmens
Copyright: Elektor Electronics

Comments

Popular posts from this blog

Electronic Extended Play Circuit Diagram

This is a Electronic Extended Play Circuit Diagram. A single op amp-one of four contained in the popular LM324-is operating in a variable pulse width, free-running square wave oscillator circuit, with its timed output driving two transistors that control the on/ off cycle of the tape-drive motor. The Oscillator` s positive feedback path holds the secret to the successful operation of the variable on/ off timing signal.   Electronic Extended Play Circuit Diagram The two diodes and pulse width potentiometer R8 allows the setting of the on and off time, without affecting the oscillator`s operating frequency. One diode allows only the discharge current to flow through it and the section of R8 that it`s connected to. The other diode, and its portion of R8, sets the charge time for the timing capacitor, C3. Since the recorder`s speed is controlled by the precise off/on timing of the oscillator, a simple voltage-regulator circuit (Ql, R3, and D4) is included.  Connecting the spe...

Power Amplifier with voltage regulator 4 × 50 Watt TDA8588

Power Amplifier with voltage regulator 4 × 50 Watt TDA8588    The TDA8588 is a multiple voltage regulator combined with four independent audio power amplifiers configured in bridge tied load with diagnostic capability. The output voltages of all regulators except regulators 2 and 3 can be controlled via the I2C-bus. However, regulator 3 can be set to 0 V via the I2C-bus. The output voltage of regulator 2 (microcontroller supply) and the maximum output voltage of regulator 3 (mechanical digital and microcontroller supplies) can both be either 5 V or 3.3 V depending on the type number. The maximum output voltages of both regulators are fixed to avoid any risk of damaging the microcontroller that may occur during a disturbance of the I 2C-bus. The amplifier diagnostic functions give information about output offset, load, or short-circuit. Diagnostic functions are controlled via the I2C-bus. The TDA8588 is protected against short-circuit, over-temperature, open ground and open VP ...

Siemens LOGO PLC Ladder Programming Steps

Siemens LOGO PLC Ladder  Programming Steps  Following are Step by Step instruction to Program Siemens Logo PLC Siemens Logo PLC Click on “ Siemens LOGO ” Click on “ siemens rse ” Click on “ StartLOGOComfor t” Wait… You will find the work pad where you have to write FBD programme Use “menus” given at the top and bottom to develop a FBD programme. Find Tools toolbar, Standard toolbar, Menu bar and Status bar. Entering a New program : Click on “ File ”               “ New ”               Create a program using Toolbars and Function blocks (Constants, General and Special functions) • You can then place any of those functions on the drawing board simply by clicking on the drawing board in the desired position. The function on the extreme left is selected by default but you can select any of the others by clicking them with the mouse. • It is not necessary to position the objects precisely at this point. • To ...